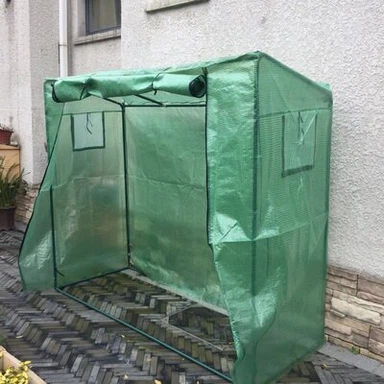
How to Assemble a DIY Greenhouse: A Step-by-Step Installation Guide
Sep 17, 2026
A DIY greenhouse kit can make greenhouse installation much more manageable, especially when the structure is designed with pre-cut galvanized steel tubes and PE greenhouse film. Instead of fabricating the frame from raw materials, the main task is to follow the assembly instructions, c006Fnnect the numbered tubes in the correct order, and secure the cover properly.
For a greenhouse made from a galvanized steel frame and PE plastic film, the installation process usually follows a clear sequence: prepare the site, organize the components, assemble the steel frame, install the door and ventilation structure, tighten the frame connections, and then install and secure the PE film.
The order of installation matters. For example, the bolts should not be fully tightened before all the frame tubes are connected, and the side roll-up ventilation system should be installed as part of the frame assembly rather than after the greenhouse has already been covered.
This guide explains the complete process step by step.
Key Takeaways
A successful DIY greenhouse installation mainly depends on three things: correct frame assembly, proper PE film installation, and secure final fixing.
Before starting, make sure all components are available and organized according to the instruction manual. During frame assembly, connect the numbered steel tubes with bolts and nuts without fully tightening them. Once the complete frame is in position, check the alignment and then tighten all connections.
After the steel structure is completed, install the front and rear door film first, followed by the main PE greenhouse film. Leave extra film along both sides so it can be buried into the ground for additional fixation. Finally, cover exposed bolt ends with caps to help prevent the metal edges from damaging the PE film.
Important: The exact tube lengths, connectors, anchor system, film-fixing method, and door configuration vary between greenhouse kits. Always use the manufacturer's assembly manual for the exact component positions and measurements.
What You Need Before Starting
Before beginning assembly, prepare a suitable installation area and make sure you have all the components and basic tools required for the job.
A typical DIY greenhouse kit may include:
- Galvanized steel tubes
- Bolts and nuts
- Frame connectors
- Door frame tubes
- Side roll-up ventilation components
- PE greenhouse film
- Film clips
- Anchoring components
- Bolt caps
- Installation instructions
Basic tools may include a tape measure, spanner or wrench, screwdriver, ladder, gloves, and other tools specified in the assembly manual.
It is also a good idea to check the package against the parts list before starting. Missing or misplaced components are much easier to identify before the frame is partially assembled.
Steps to Assemble a DIY Greenhouse
Step 1: Prepare the Greenhouse Site
Choose a level and well-drained area before assembling the greenhouse.
Remove stones, branches, sharp objects, and other debris from the installation area. These materials can interfere with the frame installation and may later damage the PE film.
The greenhouse footprint should also be large enough to accommodate the full structure, doors, ventilation openings, and working space around the greenhouse.
Before assembling the frame, mark the approximate greenhouse position on the ground. Check the length and width carefully so the frame can be aligned correctly during installation.
For more information about planning and preparing a high tunnel site, the University of Maine Cooperative Extension's High Tunnel Grower Checklist covers site preparation, access, irrigation, utilities, and other factors to consider before construction.
A properly prepared site makes the rest of the assembly process much easier.

Step 2: Check and Organize All Components
Once the site is ready, unpack the greenhouse components and organize them according to the installation manual.
One of the most useful features of a pre-engineered DIY greenhouse kit is that the steel tubes can be identified by number. Instead of trying to determine where each tube belongs by its shape alone, you can match the tube numbers with the assembly instructions.
Lay the bolts, nuts, connectors, film clips, and other small components in separate groups so they are easy to access during installation.
Do not start connecting tubes randomly. Following the numbered sequence in the manual helps prevent incorrect assembly and unnecessary disassembly later.

Step 3: Lay Out the Steel Tubes on the Ground
Before building the greenhouse upward, lay the steel tubes flat on the ground according to the assembly instructions.
Arrange the numbered tubes in the approximate positions where they will be installed.
This simple preparation step can make the entire process more efficient. It allows the installers to see the overall frame structure before connecting the components and makes it easier to identify the correct tube for each position.
It also reduces the amount of time spent moving around the installation area looking for individual parts.
For larger greenhouse kits, organizing the steel tubes before assembly is especially helpful because there may be many similar-looking components.
Step 4: Connect the Vertical Frame Tubes
Start by connecting the vertical support tubes around the sides and ends of the greenhouse.
Use the specified bolts and nuts to connect the tubes according to their numbered positions.
At this stage, do not fully tighten the bolts and nuts.
The connections should be secure enough to hold the tubes together while still allowing a small amount of movement. This adjustment space is important because the complete frame has not yet been assembled.
Following the correct sequence helps the different sections of the greenhouse line up as more tubes are added.
Step 5: Install the Top Frame Tubes
Once the main vertical supports are connected, continue with the upper frame tubes.
Connect the top tubes to the vertical supports using the bolts and nuts specified in the assembly instructions.
Again, leave the connections slightly loose instead of tightening everything immediately.
As more sections are connected, the complete greenhouse frame will gradually take shape. This frame-and-film structure is commonly used in polytunnel greenhouses, where galvanized steel tubes support a flexible PE cover.
Keeping the connections adjustable at this stage allows the installers to correct minor alignment differences before the entire structure is permanently tightened.
Step 6: Assemble the Door Frame
First, connect the door frame part separately, and then connect the built door frame with the main part of the greenhouse.
Make sure the door frame is positioned correctly because it will later determine the location and shape of the front or rear door film.
The door frame connections should also remain slightly loose until the main structure has been fully assembled and checked.
Before moving on, confirm that the door frame is upright and properly aligned with the rest of the greenhouse.
Step 7: Complete the Steel Frame Assembly
Continue installing all remaining steel tubes, braces, connectors, and other structural components included in the greenhouse kit.
Work through the assembly instructions in sequence until every tube has been installed.
Before tightening the frame, inspect the entire structure.
Check that:
- All numbered tubes are in the correct positions
- The frame is properly aligned
- The door frame is positioned correctly
- All major connections are present
- No steel tube is visibly out of position
This is the best time to make small adjustments because the frame connections have not yet been fully tightened.

Step 8: Align the Frame and Tighten All Bolts and Nuts
Once the complete steel frame has been assembled, make the final alignment adjustments.
Check the overall shape of the greenhouse and make sure the main structural sections are positioned correctly.
After confirming that the frame is properly aligned, tighten all bolts and nuts.
This assembly method is important because tightening every connection too early can make it difficult to align later components. Leaving the connections adjustable until the full frame is assembled gives the structure enough flexibility for final positioning.
Once all connections are tightened, the galvanized steel frame is ready for the PE film installation. The accuracy of the pre-drilled holes, tube lengths, bending, and included accessories can make a significant difference during assembly. If you are interested in how these components are prepared before shipment, see our greenhouse manufacturing process.
Step 9: Install the Front and Rear Door Film
With the steel frame complete, begin installing the PE film.
The front and rear door sections should be covered first.
Position the door film carefully around the door frames and secure it according to the greenhouse's fixing method.
Pay attention to the door opening and make sure the film does not interfere with door movement.
The film should be positioned neatly around the frame without excessive folds or unnecessary tension.
Completing the front and rear sections first makes it easier to move on to the main greenhouse cover.
Step 10: Install the Main PE Greenhouse Film
After the front and rear sections are covered, install the main PE greenhouse film over the top of the structure.
Because the film is large and lightweight, it is much easier to install with several people working together.
Choose a relatively calm day for this step. Strong wind can make a large sheet of PE film difficult to control and can increase the risk of tearing or misalignment.
Carefully position the film over the galvanized steel frame and adjust it so that it is evenly distributed on both sides. Once the PE film is correctly positioned, secure it to the greenhouse frame using the supplied film clips or other designated fixing components.
Do not cut the film flush with the greenhouse sides. A length of about 50 cm should be reserved for pre-buried. That is, the excess 50 cm of the membrane should be buried in the ground to serve as a fixing material.

Step 11: Cover Exposed Bolt Ends and Check the Final Details
The final stage is a detailed inspection of the completed greenhouse.
Some bolts may extend slightly beyond the steel tube connections after assembly. These exposed ends can potentially come into contact with the PE film.
Use the supplied bolt caps to cover the protruding bolt ends.
This small detail helps reduce the risk of the metal edges rubbing against or scratching the PE film over time.
How Long Does It Take to Assemble a DIY Greenhouse?
The total installation time depends on the greenhouse size, frame design, number of installers, site conditions, and familiarity with the assembly instructions.
For a pre-engineered greenhouse kit, the process is generally much more straightforward than fabricating a structure from raw steel and plastic materials.
Most of the work consists of:
- Organizing the numbered tubes
- Connecting the steel frame
- Installing the door and ventilation structure
- Aligning and tightening the frame
- Installing the front and rear door film
- Installing and securing the main PE film
- Completing the final fixing details
Larger greenhouse structures may require more people, particularly when positioning the PE film.
The objective should not simply be to finish as quickly as possible. Taking enough time to align the frame and install the cover correctly can make the finished greenhouse more stable and easier to maintain
Final Thoughts
Installing a DIY greenhouse does not need to be complicated when the kit is designed for straightforward assembly and the installation steps are followed in the correct order.
For a greenhouse made from a galvanized steel frame and PE greenhouse film, the process starts with organizing the numbered steel tubes and assembling the frame with bolts and nuts. The connections should remain adjustable until the full structure, door frame, and side roll-up ventilation system are in place. Once the frame has been aligned, all bolts and nuts can be tightened.
The PE film is installed only after the steel structure is complete. Start with the front and rear door film, then install the main cover over the greenhouse. Leave extra film along both sides for burying and securing the cover, and use film clips to hold the PE film in place.
Finally, inspect the entire structure and cover any exposed bolt ends with caps to help protect the film from damage.
Following this sequence makes DIY greenhouse assembly more organized and helps ensure that the finished greenhouse frame, ventilation system, and PE cover work together as intended.
FAQ
How difficult is it to assemble a DIY greenhouse?
A DIY greenhouse kit with pre-cut and numbered galvanized steel tubes is relatively straightforward to assemble when you follow the installation manual step by step. The main process involves laying out the tubes, connecting the frame with bolts and nuts, installing the door and side roll-up ventilation system, tightening the completed frame, and then installing the PE film. Larger greenhouses may require more people, especially when positioning the main cover.
Do I need to tighten the bolts during frame assembly?
No. The bolts and nuts should initially be installed without fully tightening them. Keeping the connections slightly loose allows you to adjust the position of the steel tubes as the rest of the frame is assembled. Once all the frame components are connected and properly aligned, you can tighten all the bolts and nuts.
Why are the greenhouse steel tubes numbered?
Numbered steel tubes make DIY greenhouse assembly more organized and reduce the risk of installing the wrong component. You can match each tube with the corresponding number in the installation manual and lay the components out on the ground before assembly.
When should I install the greenhouse door frame?
The door frame should be installed as part of the main steel frame assembly. It should be connected before the PE film is installed, rather than added afterward. This allows the door structure and surrounding frame to be aligned together.
Why do I need to leave extra PE film along the sides?
Extra PE film is needed along both sides so that the edges can be buried into the ground. This helps secure the cover at the base of the greenhouse and reduces movement of the film near ground level. Do not cut the side film flush with the frame before this step is completed.
How do you secure PE greenhouse film to the frame?
The PE film can be secured to the greenhouse frame with the designated film clips or other fixing components supplied with the kit. Position the film evenly first, then secure it progressively while checking the tension and alignment.